插件原理回顾
在前面,我们通过 MyBatis插件机制介绍与原理 分析了 MyBatis 插件的基本原理,但是可能还只是理论上的分析,没有实战的锻炼可能理解的还是不够透彻。接下来,我们通过自定义插件实例来进一步深度理解 MyBatis 插件的插件机制。文章源自浅海拾贝-https://blog.terwergreen.com/custom-mybatis-plug-in-z1o92wh.html
插件接口
-
MyBatis 插件接口-Interceptor 有哪些方法?文章源自浅海拾贝-https://blog.terwergreen.com/custom-mybatis-plug-in-z1o92wh.html
-
intercept方法,插件的核心方法 -
plugin方法 -
setProperties方法
-
自定义插件
现在,我们从零开始,设计实现一个自定义插件。文章源自浅海拾贝-https://blog.terwergreen.com/custom-mybatis-plug-in-z1o92wh.html
-
新建一个 Maven 项目,然后导入 Mybatis 对应 jar 包文章源自浅海拾贝-https://blog.terwergreen.com/custom-mybatis-plug-in-z1o92wh.html
<!--mybatis坐标--> <dependency> <groupId>org.mybatis</groupId> <artifactId>mybatis</artifactId> <version>3.5.6</version> </dependency> <dependency> <groupId>org.jboss</groupId> <artifactId>jboss-vfs</artifactId> <version>3.2.15.Final</version> </dependency> <!--mysql驱动坐标--> <dependency> <groupId>mysql</groupId> <artifactId>mysql-connector-java</artifactId> <version>8.0.16</version> <scope>runtime</scope> </dependency> -
接下来,完善 sqlMapConfig.xml、jdbc.properties 等文章源自浅海拾贝-https://blog.terwergreen.com/custom-mybatis-plug-in-z1o92wh.html
<!DOCTYPE configuration PUBLIC "-//mybatis.org//DTD Config 3.0//EN"
        "http://mybatis.org/dtd/mybatis-3-config.dtd">
<configuration>
    <!-- 加载外部的propeties文件 -->
    <properties resource="jdbc.properties"/>

    <settings>
        <!-- 输出日志 -->
        <setting name="logImpl" value="STDOUT_LOGGING"/>
    </settings>

    <!-- 为实体的全限定类名取别名 -->
    <typeAliases>
        <!-- 给单独的实体起别名 -->
        <!-- <typeAlias type="space.terwer.pojo.User" alias="user"/> -->

        <!-- 批量起别名:改包下所有类本身的类名,不区分大小写 -->
        <package name="space.terwe.pojo"/>
    </typeAliases>

    <!-- environments:运行环境 -->
    <environments default="development">
        <environment id="development">
            <!-- 当前事务交给JDBC管理 -->
            <transactionManager type="JDBC"/>
            <!-- 当前使用MyBatis提供的连接池 -->
            <dataSource type="POOLED">
                <property name="driver" value="${jdbc.driver}"/>
                <property name="url" value="${jdbc.url}"/>
                <property name="username" value="${jdbc.username}"/>
                <property name="password" value="${jdbc.password}"/>
            </dataSource>
        </environment>
        <environment id="production">
            <transactionManager type="JDBC"/>
            <dataSource type="POOLED">
                <property name="driver" value="${jdbc.driver}"/>
                <property name="url" value="${jdbc.url}"/>
                <property name="username" value="${jdbc.username}"/>
                <property name="password" value="${jdbc.password}"/>
            </dataSource>
        </environment>
    </environments>

    <!-- 引入映射配置文件 -->
    <mappers>
       <!--
       <mapper class="space.terwer.mapper.IUserMapperr"/>
       -->
       <package name="space.terwer.mapper"/>
    </mappers>
</configuration>
jdbc.driver=com.mysql.cj.jdbc.Driver jdbc.url=jdbc:mysql://localhost:3306/test?characterEncoding=utf8&useSSL=false jdbc.username=terwer jdbc.password=123456pojo 和 mapper文章源自浅海拾贝-https://blog.terwergreen.com/custom-mybatis-plug-in-z1o92wh.html
package space.terwer.pojo;

import java.io.Serializable;

/**
 * @author terwer on 2024/6/13
 */
public class User implements Serializable {
    private Integer id;
    private String username;

    public Integer getId() {
        return id;
    }

    public void setId(Integer id) {
        this.id = id;
    }

    public String getUsername() {
        return username;
    }

    public void setUsername(String username) {
        this.username = username;
    }

    @Override
    public String toString() {
        return "User{" +
                "id=" + id +
                ", username='" + username + '\'' +
                '}';
    }
}
package space.terwer.mapper; import space.terwer.pojo.User; import java.util.List; /** * @author terwer on 2024/6/13 */ public interface IUserMapper { /** * 查询用户 */ List<User> findAll(); }<?xml version="1.0" encoding="UTF-8" ?> <!DOCTYPE mapper PUBLIC "-//mybatis.org//DTD Mapper 3.0//EN" "http://mybatis.org/dtd/mybatis-3-mapper.dtd"> <mapper namespace="space.terwer.mapper.IUserMapper"> <resultMap id="userMap" type="space.terwer.pojo.User"> <result property="id" column="id"></result> <result property="username" column="username"></result> </resultMap> <!-- resultMap:手动配置实体属性与表字段的映射关系 --> <select id="findAll" resultMap="userMap"> select id, username from user </select> </mapper> -
编写测试用例,让 mybatis 先跑起来文章源自浅海拾贝-https://blog.terwergreen.com/custom-mybatis-plug-in-z1o92wh.html
package space.terwer; import org.apache.ibatis.io.Resources; import org.apache.ibatis.session.SqlSession; import org.apache.ibatis.session.SqlSessionFactory; import org.apache.ibatis.session.SqlSessionFactoryBuilder; import org.junit.Before; import org.junit.Test; import space.terwer.mapper.IUserMapper; import space.terwer.pojo.User; import java.io.InputStream; import java.util.List; import static org.junit.Assert.assertTrue; /** * @author terwer on 2024/6/13 */ public class MainTest { private IUserMapper userMapper; private SqlSession sqlSession; @Before public void before() throws Exception { System.out.println("before..."); InputStream resourceAsStream = Resources.getResourceAsStream("sqlMapConfig.xml"); SqlSessionFactory sqlSessionFactory = new SqlSessionFactoryBuilder().build(resourceAsStream); sqlSession = sqlSessionFactory.openSession(); // 这样也是可以的,这样的话后面就不用每次都设置了 // sqlSession = sqlSessionFactory.openSession(true); userMapper = sqlSession.getMapper(IUserMapper.class); } @Test public void testFindAll() { List<User> all = userMapper.findAll(); for (User user : all) { System.out.println(user); } } }效果如下:文章源自浅海拾贝-https://blog.terwergreen.com/custom-mybatis-plug-in-z1o92wh.html
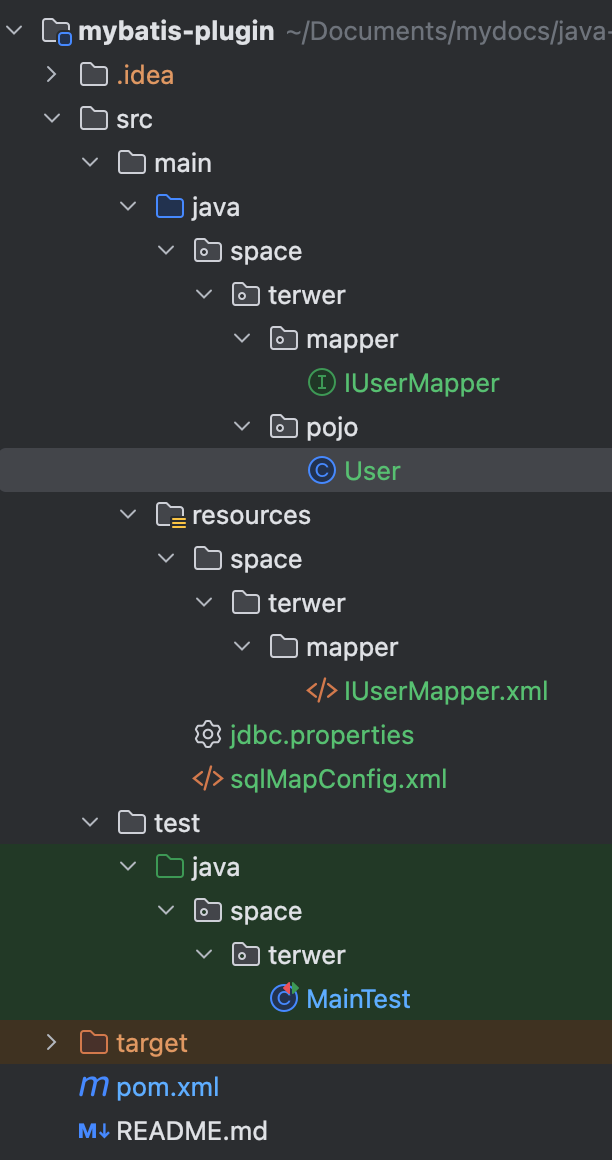
Setting autocommit to false on JDBC Connection [com.mysql.cj.jdbc.ConnectionImpl@1ed1993a] ==> Preparing: select id, username from user ==> Parameters: <== Columns: id, username <== Row: 1, lisi <== Row: 2, tom <== Row: 8, 测试2 <== Row: 9, 测试3 <== Total: 4 User{id=1, username='lisi'} User{id=2, username='tom'} User{id=8, username='测试2'} User{id=9, username='测试3'}此时,整个项目结构如下:文章源自浅海拾贝-https://blog.terwergreen.com/custom-mybatis-plug-in-z1o92wh.html
-
编写插件
MyPlugin文章源自浅海拾贝-https://blog.terwergreen.com/custom-mybatis-plug-in-z1o92wh.htmlpackage space.terwer.plugin; import org.apache.ibatis.executor.statement.StatementHandler; import org.apache.ibatis.plugin.Interceptor; import org.apache.ibatis.plugin.Intercepts; import org.apache.ibatis.plugin.Invocation; import org.apache.ibatis.plugin.Signature; import java.sql.Connection; import java.util.Properties; /** * @author terwer on 2024/6/13 */ @Intercepts({ @Signature( type = StatementHandler.class, method = "prepare", args = {Connection.class, Integer.class} ) }) public class MyPlugin implements Interceptor { @Override public Object intercept(Invocation invocation) throws Throwable { // 增强逻辑 System.out.println("这里是插件的增强方法...."); // 执行原方法 return invocation.proceed(); } /** * 主要是为了把这个拦截器生成一个代理放到拦截器链中 * ^Description包装目标对象 为目标对象创建代理对象 * @Param target为要拦截的对象 */ @Override public Object plugin(Object target) { System.out.println("将要包装的目标对象:" + target); return Interceptor.super.plugin(target); } /** * 获取配置文件的属性,插件初始化的时候调用,也只调用一次,插件配置的属性从这里设置进来 **/ @Override public void setProperties(Properties properties) { System.out.println("插件配置的初始化参数:" + properties); Interceptor.super.setProperties(properties); } }将插件配置到 sqlMapConfig.xm l 中。文章源自浅海拾贝-https://blog.terwergreen.com/custom-mybatis-plug-in-z1o92wh.html
<plugins> <plugin interceptor="space.terwer.plugin.MyPlugin"> <property name="param1" value="value1"/> </plugin> </plugins>查看效果文章源自浅海拾贝-https://blog.terwergreen.com/custom-mybatis-plug-in-z1o92wh.html
Using VFS adapter org.apache.ibatis.io.JBoss6VFS
插件配置的初始化参数:{param1=value1}
PooledDataSource forcefully closed/removed all connections.
PooledDataSource forcefully closed/removed all connections.
PooledDataSource forcefully closed/removed all connections.
PooledDataSource forcefully closed/removed all connections.
Checking to see if class space.terwer.mapper.IUserMapper matches criteria [is assignable to Object]
将要包装的目标对象:org.apache.ibatis.executor.CachingExecutor@262b2c86
将要包装的目标对象:org.apache.ibatis.scripting.defaults.DefaultParameterHandler@c81cdd1
将要包装的目标对象:org.apache.ibatis.executor.resultset.DefaultResultSetHandler@289d1c02
将要包装的目标对象:org.apache.ibatis.executor.statement.RoutingStatementHandler@17d0685f
Opening JDBC Connection
Created connection 1183888521.
Setting autocommit to false on JDBC Connection [com.mysql.cj.jdbc.ConnectionImpl@4690b489]
这里是插件的增强方法....
==>  Preparing: select id, username from user
==> Parameters:
<==    Columns: id, username
<==        Row: 1, lisi
<==        Row: 2, tom
<==        Row: 8, 测试2
<==        Row: 9, 测试3
<==      Total: 4
User{id=1, username='lisi'}
User{id=2, username='tom'}
User{id=8, username='测试2'}
User{id=9, username='测试3'}
可以看到,插件确实生效了。
总结
通过上面的自动插件实例,我再来进一步分析一下:文章源自浅海拾贝-https://blog.terwergreen.com/custom-mybatis-plug-in-z1o92wh.html
在四大对象创建的时候文章源自浅海拾贝-https://blog.terwergreen.com/custom-mybatis-plug-in-z1o92wh.html
1、每个创建出来的对象不是直接返回的,而是 interceptorChain.pluginAll(parameterHandler);文章源自浅海拾贝-https://blog.terwergreen.com/custom-mybatis-plug-in-z1o92wh.html
2、获取到所有的 Interceptor (拦截器)(插件需要实现的接口);调用 interceptor.plugin(target),返回 target 包装后的对象;文章源自浅海拾贝-https://blog.terwergreen.com/custom-mybatis-plug-in-z1o92wh.html
3、插件机制:我们可以使用插件为目标对象创建一个代理对象 AOP (面向切面);我们的插件可以为四大对象创建出代理对象,代理对象就可以拦截到四大对象的每一个执行;文章源自浅海拾贝-https://blog.terwergreen.com/custom-mybatis-plug-in-z1o92wh.html
那么,插件具体是如何拦截并附加额外的功能的呢?以 ParameterHandler 来说:文章源自浅海拾贝-https://blog.terwergreen.com/custom-mybatis-plug-in-z1o92wh.html
// org.apache.ibatis.session.Configuration
  public ParameterHandler newParameterHandler(MappedStatement mappedStatement, Object parameterObject, BoundSql boundSql) {
    ParameterHandler parameterHandler = mappedStatement.getLang().createParameterHandler(mappedStatement, parameterObject, boundSql);
    parameterHandler = (ParameterHandler) interceptorChain.pluginAll(parameterHandler);
    return parameterHandler;
  }
interceptorChain 保存了所有的拦截器(interceptors),是 mybatis 初始化的时候创建的。调用拦截器链 中的拦截器依次的对目标进行拦截或增强。interceptor.plugin(target) 中的 target 就可以理解为 mybatis 中的四大对象。返回 的 target 是被重重代理后的对象。文章源自浅海拾贝-https://blog.terwergreen.com/custom-mybatis-plug-in-z1o92wh.html
// org.apache.ibatis.plugin.InterceptorChain

  public Object pluginAll(Object target) {
    for (Interceptor interceptor : interceptors) {
      target = interceptor.plugin(target);
    }
    return target;
  }
例如:如果我们想要拦截 Executor 的 query 方法,那么可以稍微修改一下,这样定义插件:文章源自浅海拾贝-https://blog.terwergreen.com/custom-mybatis-plug-in-z1o92wh.html
@Intercepts({
        @Signature(
                type = Executor.class,
                method = "query",
                args = {MappedStatement.class, Object.class, RowBounds.class, ResultHandler.class}
        )
})
public class ExeunplePlugin implements Interceptor {
    // TODO
}
这样 MyBatis 在启动时可以加载插件,并保存插件实例到相关对象(InterceptorChain,拦截器链) 中。待准备工作 做完后,MyBatis 处于就绪状态。我们在执行 SQL 时,需要先通过 DefaultSqlSessionFactory 创建 SqlSession。Executor 实例会在创建 SqlSession 的过程中被创建, Executor 实例创建完毕后,MyBatis 会通过 JDK 动态代理为 实例生成代理类。这样,插件逻辑即可在 Executor 相关方法被调用前执行。文章源自浅海拾贝-https://blog.terwergreen.com/custom-mybatis-plug-in-z1o92wh.html
数据库脚本
-- show databases;
-- select version();
-- drop user 'terwer'@'%';
-- CREATE USER 'terwer'@'%' IDENTIFIED BY '123456';
-- GRANT ALL PRIVILEGES ON *.* TO 'terwer'@'%' WITH GRANT OPTION;
-- flush privileges;
-- create database test default character set utf8 collate utf8_general_ci;

-- user
create table if not exists user
(
    id       int auto_increment
        primary key,
    username varchar(50) null,
    password varchar(50) null,
    birthday varchar(50) null
)
    charset = utf8;

-- user data
INSERT INTO test.user (id, username, password, birthday) VALUES (1, 'lisi', '123', '2019-12-12');
INSERT INTO test.user (id, username, password, birthday) VALUES (2, 'tom', '123', '2019-12-12');
INSERT INTO test.user (id, username, password, birthday) VALUES (8, '测试2', null, null);
INSERT INTO test.user (id, username, password, birthday) VALUES (9, '测试3', null, null);
本文源码
mybatis-plugin文章源自浅海拾贝-https://blog.terwergreen.com/custom-mybatis-plug-in-z1o92wh.html
文章更新历史文章源自浅海拾贝-https://blog.terwergreen.com/custom-mybatis-plug-in-z1o92wh.html
2024/06/13 初稿 文章源自浅海拾贝-https://blog.terwergreen.com/custom-mybatis-plug-in-z1o92wh.html
本文介绍了如何通过自定义插件来深入理解 MyBatis 插件的原理和机制,包括创建 Maven 项目、导入 MyBatis 相关依赖、完善配置文件等。同时还涵盖了插件接口-Interceptor 的相关方法以及自定义插件的实现过程。文章源自浅海拾贝-https://blog.terwergreen.com/custom-mybatis-plug-in-z1o92wh.html
- 扫码加我微信
- 验证消息请输入:来自你的博客
-

- 我的微信公众号
- 微信扫一扫与我交流吧
-


评论